It takes a 3D model you already have and gives back a set of printable pieces that lock together into that same model.
You bring an STL, OBJ or GLB file. The model is sliced into flat horizontal layers, each layer is cut into pieces along an interlocking seam, and every piece is written out as its own printable part. Nothing about the shape is invented: every piece is cut out of the material the model already had, and putting all of them together reproduces the model.
The whole run happens in five steps, and you can go back to any of them. Each step shows its own result in the viewport before you move on, so you are never choosing a number blind.
One export costs one credit, however many pieces the puzzle has. Everything before the export costs nothing: importing, slicing, patterning, building, inspecting and rebuilding as often as you like.
A model going through all five steps, from import to finished pieces./help/overview-pipeline.webm
Where the work happens, and how long it takes
All of the geometry is computed on your own computer, in your browser. The model file you import is never uploaded.
Slicing, patterning and cutting run inside the browser tab, in a background worker, using a WebAssembly geometry kernel. The file you import is read from your disk by the page and stays there. It is not sent to a server and it is not visible to anybody else, including us. The one exception is deliberate and opt-in: a separate permission in your account settings offers to share the source model for quality investigation, and until you grant it, nothing of the sort is sent.
Two things do reach the server, and both are worth being precise about. When a build finishes, the finished puzzle (the piece geometry, not your original file) is saved privately to your account so it appears in your slice history and can be downloaded again later. And when you export, that same piece geometry is sent so the archive can be built and the credit taken; it is packaged in memory and the server keeps a fingerprint of it, not the geometry. Neither is published, shared or used for anything else.
That is a deliberate trade. It is why a private model stays private and why the editor keeps working when the network does not, and it is also why the build runs on whatever processor you happen to have. A puzzle that finishes in twenty seconds on a recent desktop can take several minutes on an older laptop. The result is identical; only the wait differs.
The editor gives a build a time budget of its own, between four and ten minutes depending on how many cells the grid has. If it runs out, it says so and stops rather than leaving you with half a puzzle. If that happens, the fastest fix is a coarser grid: fewer rows, fewer columns or fewer layers. The grid is capped at 6,400 candidate cells for exactly this reason.
A few practical notes. Keep the tab in the foreground while a build runs: browsers throttle background tabs and a throttled build takes far longer. Close other heavy tabs if the machine is short on memory. And a laptop on battery saver will usually be a good deal slower than the same laptop plugged in.
When an imported mesh is too dense for a responsive browser build, PuzzleForm automatically applies a browser-safe triangle reduction before scaling and slicing. The import notice shows the original and reduced triangle counts; the file on your disk is never modified. Fine surface detail may be simplified, but the solid silhouette and printable volume are prioritised.
The progress readout during a build, with the stage it is on./help/local-build-progress.webm
Does my model file get uploaded anywhere?
Not unless you ask for it to be. The file is read from your disk by the page and cut in the tab. It is sent only if you grant the separate quality-investigation permission in your account settings, which is off until you switch it on. The finished puzzle (the pieces, not your file) is saved to your account so your slice history works, and is sent when you export so the archive can be built and the credit taken.
My machine is slow. Is there anything I can do besides waiting?
Reduce the grid. Build time is roughly proportional to the number of candidate cells, so halving the rows and columns cuts the work by about four. Keep the tab in the foreground, and prefer mains power over battery. A coarser grid also gives a puzzle with larger pieces, which is often what a first test print wants anyway.
Can I close the tab while it builds?
No. The computation lives in the tab; closing it ends the build. Switching to another window is fine as long as the tab stays open, though a background tab is throttled by the browser and will take longer.
What happens when the model is too detailed for the browser?
The importer reduces dense geometry automatically to a browser-safe triangle budget and tells you the before and after counts. Your original file is unchanged. If the mesh still cannot be made into a usable solid, the editor explains that specific limitation instead of pretending that an export succeeded.
Step 1
Step 1 · Import
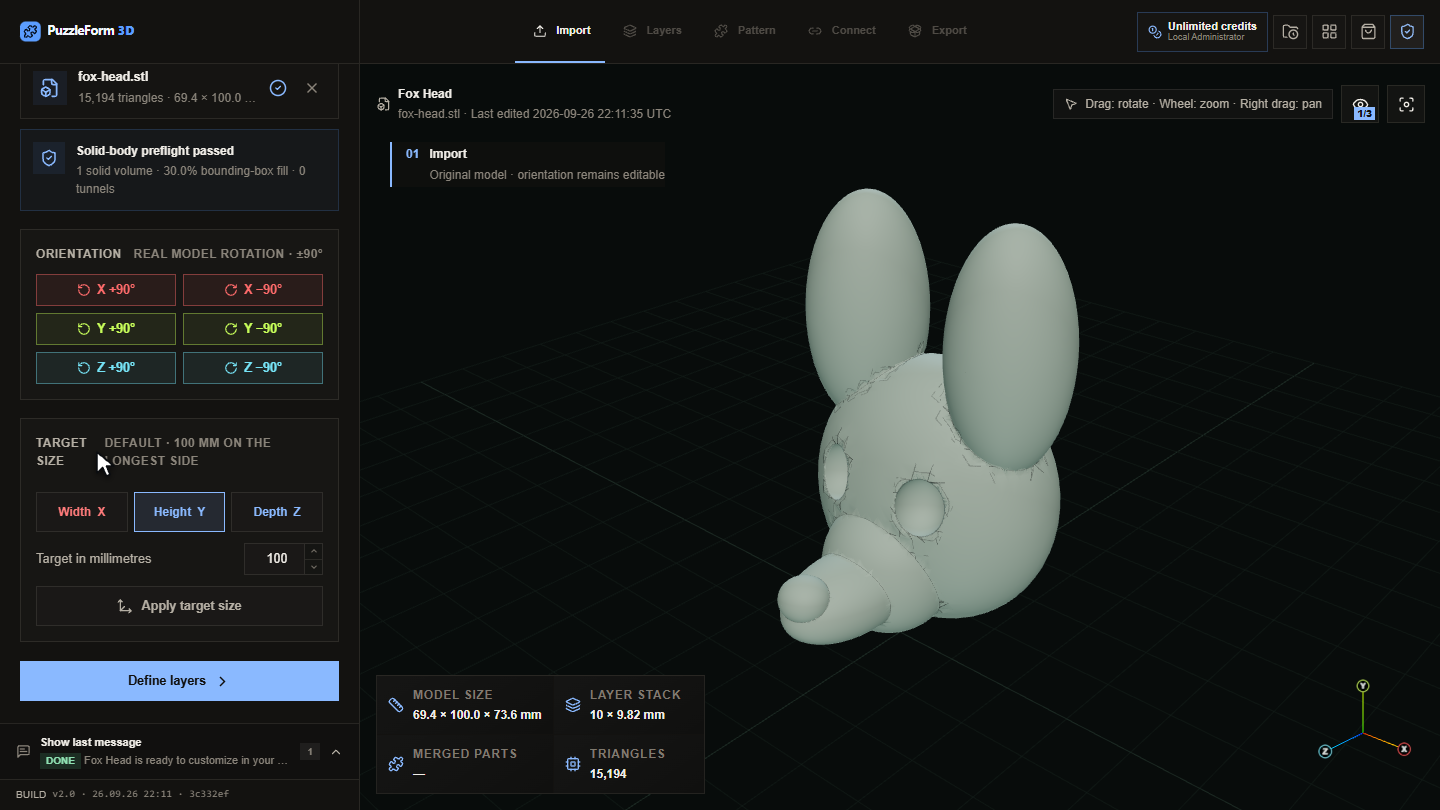
Open a model, put it the right way up and set the size you want to print.
STL, OBJ and GLB are accepted. One unit in the file is read as one millimetre, so a model authored in metres arrives very small and a model authored in centimetres arrives ten times too large. The target size control below fixes either in one move.
The model is checked as it loads and anything worth knowing is reported: separate volumes that do not touch, open surfaces, non-manifold edges, tunnels through the body, and meshes dense enough to slow the build down. A warning is not a refusal. Touching or overlapping volumes are treated as one printable object where the geometry kernel can safely join them; genuinely separated volumes remain separately traceable.
When the browser needs more headroom, dense geometry is reduced automatically and the exact triangle change is shown. This is a browser-side working copy; the original STL, OBJ or GLB file is not rewritten.
Dropping a file into the editor and the report that follows./help/step-1-import.webm
The file
STL, OBJ or GLB
Drop the file onto the panel, or use the button to pick one.
The file itself is never uploaded. It is read in the page, measured, and kept in the tab for as long as you are working on it.
A model made of several volumes is allowed. Volumes that touch or overlap are treated as one connected object when possible; a real gap is not silently bridged, so genuinely separate volumes remain separate.
Dropping an STL onto the import panel./help/step-1-drop-file.webm
Orientation
±90° around X, Y or Z
Turn the model so the direction you want the layers to run is vertical.
Layers are always cut horizontally, so the orientation you choose here decides where the seams between layers end up. A figure standing upright gets horizontal slices through it; the same figure laid on its side gets slices along its length instead.
This also decides which face ends up flat on the print bed for most of the pieces, which matters more for print quality than anything in the export step.
Turn the model before you set the size: a rotation changes which dimension the target height applies to.
The same model rotated, and how the layer stack follows./help/step-1-orientation.webm
Target size
Width, height or depth, in millimetres
Scale the whole model so one chosen dimension matches a number you give.
Pick the axis you actually care about, usually the height, type the millimetres, and the model is scaled uniformly so that axis matches. The other two follow in proportion.
Size is worth settling here rather than in the slicer. Every tolerance later in the process is an absolute distance in millimetres, so scaling the model afterwards scales those gaps with it and a fit you tested no longer holds.
The target size panel with the axis selector./help/step-1-target-size.png
Step 2
Step 2 · Layers
Set the layer count and air gap while the model stays whole.
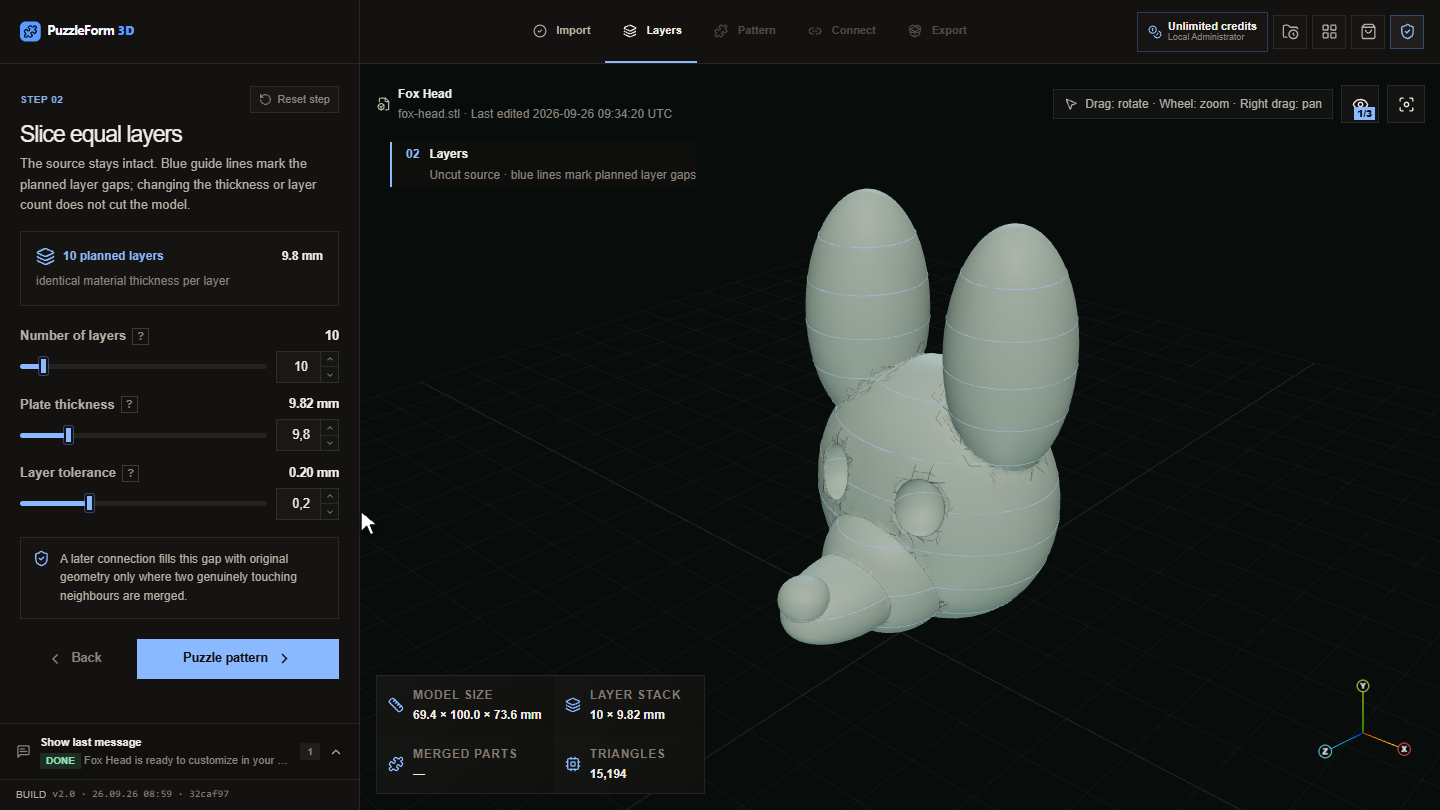
The imported model remains intact in this step. One-colour guide lines show where the horizontal cuts would fall; changing the layer count or air gap does not create or move any cut geometry.
Thicker plates mean fewer, sturdier parts. Thinner plates mean a taller stack and more work for the computer and the printer.
Continue to Step 3 to inspect the layer and pattern preview. The finished puzzle is built only after you press Preflight & build puzzle there.
Number of layers
2 to 100
How many horizontal plates the model is sliced into.
More layers mean more parts and a taller stack; fewer mean thicker, sturdier plates. After import this is set to give roughly 12 mm plates and stays fully adjustable: any value up to 100 can be typed into the field.
This is one of the two numbers that decide how long a build takes. The other is the grid in step 3, and the product of the three is what the editor calls the candidate cell count.
Plate thickness
Millimetres
The same setting as the layer count, seen from the other side.
Choosing a thickness picks the nearest whole number of layers that fits the model height, so the value shown is the thickness you actually get, not the one you asked for.
Use whichever of the two is the constraint you really have. If the print needs plates of a particular thickness, set the thickness; if the puzzle needs a particular number of pieces, set the layers.
Layer tolerance
0.05 mm to 0.60 mm
The air gap between stacked layers so the plates can be placed on each other.
The editor starts at 0.20 mm. Support residue, stringing and elephant foot can tighten the fit in practice, so a slightly wider gap is usually easier to correct than plates that will not stack.
The gap is only ever filled back in where two genuinely touching neighbours are merged into one piece. It is never filled with invented geometry.
If a printed stack binds, raise this by 0.05 mm and print one pair of plates again rather than the whole puzzle.
A diagram of the clearance between two adjoining plates./help/step-2-layer-tolerance.png
Step 3
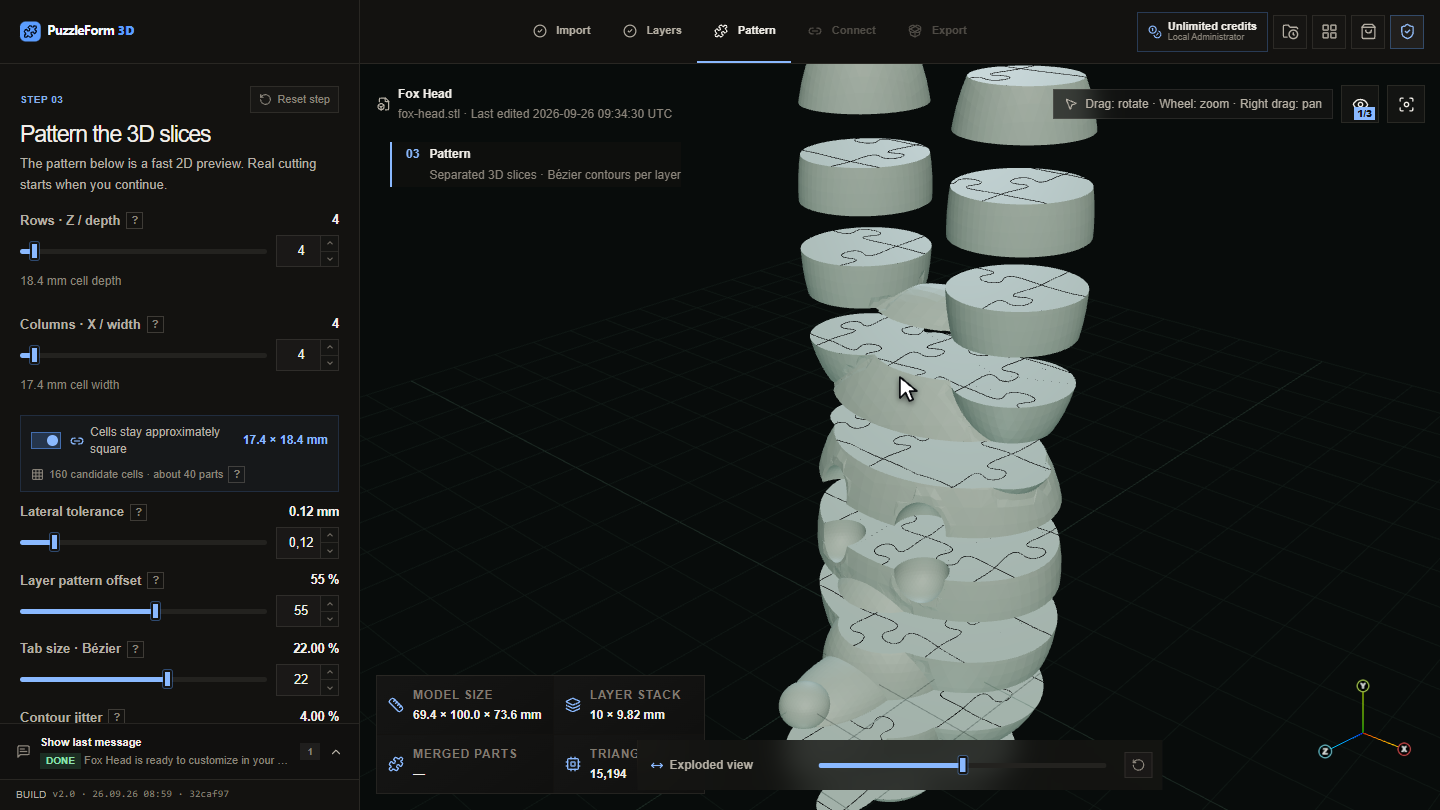
Step 3 · Pattern
Choose the grid and the shape of the seams. This is where the puzzle is decided.
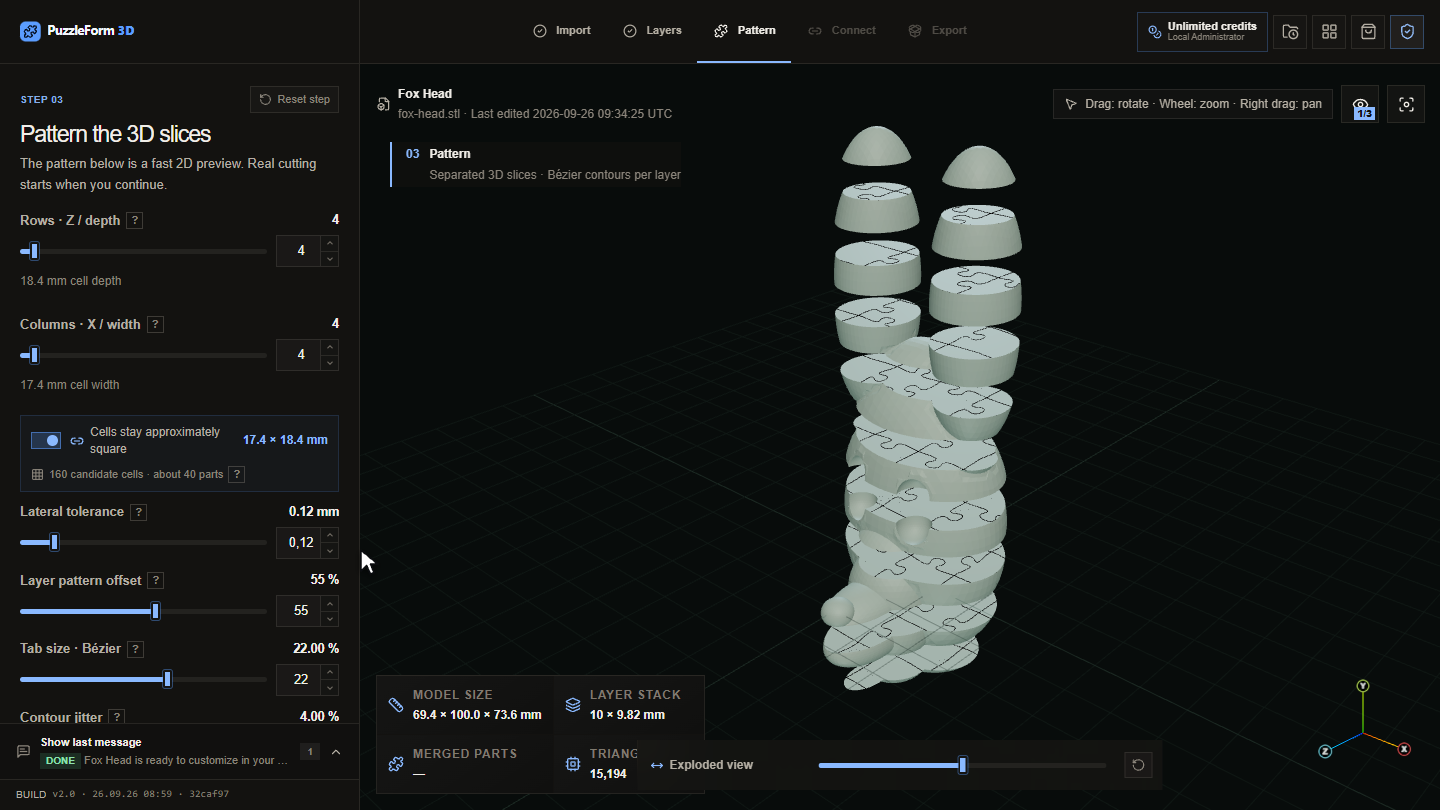
Every layer is cut along its own interlocking seam. The grid sets how many pieces there can be; the seam controls decide what those pieces look like and how firmly they hold.
Layer and seam previews update while you choose the pattern. The finished pieces and assembly checks are calculated only after you press Preflight & build puzzle.
The grid is the only control over how coarse the puzzle is. There are no easy, medium and hard levels: the generator always returns as many separate pieces as the print rules allow for the grid you chose.
Fewer, larger pieces print better. Every extra cut adds small fragments and thin seams that are harder to print and to fit. For a model 100 mm tall, around 30 pieces is a good result; a much finer grid mostly adds slivers. The editor opens with about 18 mm cells and 12 mm layers for that reason.
The seam pattern redrawing as the grid and tab size change./help/step-3-pattern.webm
Rows · Z / depth
Whole cells across the model's depth
How many cells the grid has from front to back.
Together with the columns this sets the pieces per layer. The millimetre figure under the slider is the resulting cell depth on this model, which is the honest way to judge whether a piece will be big enough to print.
The grid getting finer and the piece count following./help/step-3-rows-columns.webm
Columns · X / width
Whole cells across the model's width
How many cells the grid has from side to side.
The counterpart to the rows. With the square-cell link on, changing one moves the other so the cells stay roughly square on this model's footprint.
Cells stay approximately square
On or off
Drags the rows and columns along with each other so a cell stays roughly square.
On by default, because square cells are what most models want. Switching it off is the only way to ask for deliberately oblong pieces, for instance long and narrow across a wide model.
Lateral tolerance
0.05 mm to 0.60 mm
Total gap between two parts that sit next to each other within a layer.
The sideways counterpart to the layer tolerance. Too small and the pieces will not slide together; too large and the finished puzzle feels loose.
Start around 0.15 mm and adjust once you have printed a test. It depends far more on your printer and filament than on the model.
Two neighbouring pieces and the gap between them./help/step-3-lateral-tolerance.png
Layer pattern offset
0 % to 100 %
Shifts each layer's cut pattern against its neighbours, sideways and front to back at once.
At 0 % every layer is cut along the same lines, so seen from above the parts of all layers sit exactly on top of each other and the puzzle falls into loose columns.
Raising it staggers the seams so parts interlock vertically as well. 100 % is half a cell, the geometric maximum: beyond it a seam would land on the next grid line and you would have the original pattern back, one cell over.
If the finished puzzle comes apart in vertical columns, this is the control that fixes it.
The same stack at 0 % and at 55 % offset./help/step-3-pattern-offset.webm
Tab size · Bézier
Percentage of the cell
How far a knob reaches into the neighbouring piece.
Larger tabs grip better and survive a coarse print, but they eat into the neighbouring piece and need more clearance. Smaller tabs keep the silhouette crisp and are the first thing to fail on a thin feature.
If a build reports that it could not find a printable arrangement, increasing this is usually the fastest fix.
A seam with the tab size raised and lowered./help/step-3-tab-size.webm
Contour jitter
0 % to 13 %
How much each seam is allowed to wander off the straight grid line.
At 0 % every piece has the same machined outline. Raising it makes the pieces look hand-cut and individual, the way a real jigsaw does.
Very high values produce narrow spurs that are fragile to print, which is why the range stops where it does.
The same layer at 0 % and at 8 % jitter./help/step-3-contour-jitter.webm
Drop tabs at the rim
On or off, on by default
Cut no knob where the model's surface would cut through it.
A knob drawn where the model's surface runs through it, or so close to it that no material is left around it, prints as a thin spur or is cut off altogether. With this on, those knobs are not cut at all: the seam keeps exactly the curve it had and only the knob is gone.
Such a seam holds nothing, so it does not count towards the two tabs every piece needs. Pieces there are joined instead, which means a few larger pieces around the rim of the model.
The editor reports how many knobs were dropped once the option is on, so the trade is visible rather than implied.
Worth switching on for models with thin walls, fins or outstretched limbs. On a blocky model it usually changes nothing.
The rim of a thin feature with the option off and on./help/step-3-drop-rim-tabs.webm
Join weak print spots
On or off, on by default
Remove the spots a 1.2 mm wall does not fit into.
After the puzzle is built, every piece is searched for spots that thin (a knob shaped flange, a sliver along the rim, a plate at the top of a layer) that exist only because a seam runs past them.
Each such spot is removed with the smallest change that removes it: a whole part handed across the seam first, then the two pieces joined, on two layers wherever two do.
Parts get fewer and larger as a result. Switching it off gives the puzzle exactly as it was cut.
Switch it on when a test print keeps snapping in the same place. Leave it off when you want the maximum number of pieces.
A weak flange before and after the join./help/step-3-weak-spots.webm
Engrave part numbers
On or off, on by default
Adds a small recessed assembly number to each part where its print surface allows it.
When this is on, each part is numbered in assembly order with a small recessed sans-serif numeral on its upper print face. If a surface is too small or too thin, that part stays unchanged and its number remains in the assembly guide.
Turn it off to export unmarked parts. The assembly guide still shows the complete numbered sequence, but those numbers are references to the guide rather than engravings on the model.
Leave it on when the printed numbers will make assembly easier. Switch it off when you want completely unmarked parts.
Generator seed
Any whole number
The starting number for the random parts of the pattern: tab directions and contour jitter.
The same seed with the same settings always produces exactly the same puzzle, so a result you like can be reproduced later.
Rolling a new seed is the quickest way to try a different arrangement when a build reports a fragile one.
Rolling the seed and getting a different pattern from the same settings./help/step-3-seed.webm
Candidate cells
Up to 6,400
Rows × columns × layers: the size of the job you are about to give your computer.
It is a reading, not a control: it predicts the build time. The word beside it (Fast, Detailed, Large puzzle) is the same prediction in plain language.
The finished puzzle usually has fewer pieces than this, because parts too small to print are merged into their neighbours before anything is cut.
If a build times out, this is the number to bring down.
Step 4
Step 4 · Pieces
The real cut, the checks that follow it, and the changes you can make by hand.
This is the step that does the work. The model is cut for real, the pieces are formed, and each one is measured against the rules a printable puzzle has to satisfy: one piece spans two layers, every piece carries at least two tabs, every piece is one solid body, and no piece is smaller than a piece can usefully be.
The result is reported piece by piece. A joint you want to look at can be selected in the viewport, and the rest of the model can be faded back so you can see it.
You can also override the result. Merging two pieces by hand joins them; unmerging a piece cuts it back apart. Only the pieces you name are recut; the rest of the puzzle is left exactly as it was.
A fixed assembly rule prevents an impossible bridge: when a lower and upper part are merged across two layers, neighbours of those two parts are never connected to each other across the same boundary. This keeps the finished puzzle physically insertable instead of creating two neighbouring pieces that occupy the same two-layer path.
If a hand edit leaves a rule broken in a way that would not print, the export is held until it is fixed, and the reason is named.
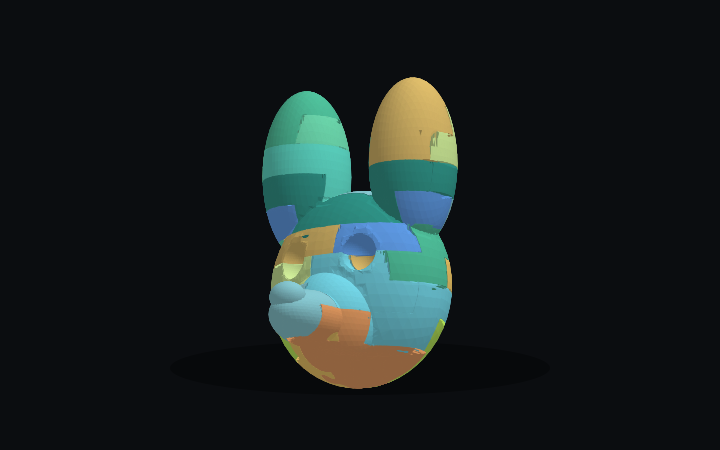
The assembled Fox Head puzzle, coloured by its print-ready pieces./marketplace/previews/fox-head-puzzle.png
Assembly check
Whether the puzzle can actually be put together, and whether it stays together.
The pieces are dropped in order, in simulation, and each one is tested for whether it can reach its place past the pieces already there and whether it is locked once it arrives. A puzzle that can be assembled but falls apart, or one that cannot be assembled at all, is reported rather than exported quietly.
Merge and unmerge
Join two pieces into one, or cut a piece back into its parts.
Select the pieces and choose the action. The worker recuts only what you named, which is why a hand edit on a large puzzle is quick even though the original build was not.
Hand edits are yours and are not folded back into the automatic measurements, so a puzzle you have edited still reports the rules honestly.
Selecting a checked piece, splitting it, then restoring the assembly with Undo./help/step-4-manual-edit.webm
Rearrange
Ask for a different arrangement of the same settings.
Every click gives a genuinely different arrangement from the same grid and seam settings. With pieces selected, only those pieces and their direct measured neighbours are regrouped; with nothing selected, the whole puzzle may be rearranged. It is the right control when the piece shapes are not what you wanted but the size of them is.
Why does the puzzle have fewer pieces than the grid suggested?
Because a cell that would hold only a sliver of material cannot be printed on its own. Those fragments are merged into the neighbour they actually touch before anything is cut. Where a model is thin, a cell may contain almost nothing at all, and that is where most of the difference comes from.
Why did the editor combine volumes or refuse a bad surface?
Touching and overlapping source volumes are joined when the geometry kernel can prove that they form one usable object. A gap is not filled with invented material. Open, non-manifold or irreparably collapsed geometry is reported and the editor keeps the build state recoverable rather than silently exporting an invalid part.
Can I make the pieces bigger?
Reduce the grid. The grid is the only coarseness control: the generator always hands back as many separate pieces as the rules allow for the grid you set, so asking for fewer pieces means asking for fewer cells.
A piece looks like a thin sliver. What happened?
It is almost always a cell that catches the very edge of a thin feature. Either bring the grid down so the feature falls inside one cell, or switch on Join weak print spots in step 3, which hands such a spot to the piece beside it.
Step 5
Step 5 · Export
One STL per piece, optional print plates and a printed guide. One credit, however many pieces.
The export is built in the tab, like everything else, and arrives as a ZIP archive your browser downloads. The credit is charged only after the archive finishes; downloading the same unlocked version again is free.
Commerce and Studio subscribers can optionally add a logo and choose two accent colours under Account settings → Assembly guide branding. These choices appear on every page of new A4 assembly guides. Without a saved logo, the guide keeps the standard PuzzleForm identity; the colours of the 3D parts remain unchanged so the assembly steps stay clear.
Choosing a format and downloading the archive./help/step-5-export.webm
Export format
One file per piece, or pieces laid out together on print plates.
Separate files suit a slicer you arrange yourself. Grouped plates arrive already laid out, which is quicker when the puzzle has a lot of pieces.
Build plate order
Assembly or random
Place parts in their verified build order or use a stable shuffle.
The spacing is set automatically so every plate stays readable. Choose assembly order when you want the printed parts to follow the visual guide, or random order when you prefer a different layout.
Build plate size
0 mm to 400 mm
Where the layout wraps onto another plate.
Set it to your printer's bed and the parts are distributed across as many plates as they need. 0 mm keeps every part on one unbounded plate.
What is in the archive?
One STL per piece (or per plate, if you chose plates), and a printed guide listing the pieces, which layer each belongs to and the settings the puzzle was built with.
When is the credit taken?
After the archive is successfully built, never before. If the export fails, nothing is charged. Downloading the same unlocked export again costs nothing.
Can I put my own branding on the assembly guide?
Commerce and Studio subscribers can save a logo and two accent colours in Account settings. They apply to new A4 guides. If you have not saved a logo, the standard PuzzleForm guide is used.
Printing the result
What the pieces expect from a printer, and the two settings that decide whether they fit.
Print the pieces flat, the way they were cut. They are designed to sit on a layer plane, which means no supports for the overwhelming majority of parts.
The two tolerances, layer tolerance in step 2 and lateral tolerance in step 3, are the fit. They are absolute distances in millimetres, and how much of them survives depends on your printer, your filament and your slicer far more than on the model. Print two neighbouring pieces first and check the fit before committing to the whole set.
If the pieces are too tight, raise the tolerance by 0.05 mm and try the same pair again. If they are loose, lower it by the same step. Changing the model scale afterwards is the one thing that will undo a fit you have tested, because the tolerance does not scale with it.
Editor preview of neighbouring pieces with the lateral clearance between them./help/printing-test-pair.png
Account, credits and projects
What an account is for, what a credit buys and where your work is kept.
An account exists so exports can be paid for and projects can be kept. Everything before the export works the same either way.
A credit buys one export: one archive, however many pieces are in it. Credits do not expire while the account is open.
An optional referral programme can award credits to an existing account after a genuinely new person registers through its invitation link; self-referrals and duplicate accounts are excluded and the reward event is recorded.
A project you save is stored against your account so you can come back to it. Saving is deliberate: nothing is uploaded because you happened to open a model.
The model library currently contains ten original STL shapes from PuzzleForm Studio: a waterdrop, heart, star, skull, lion head, fox head, owl, mushroom, rocket and chess pawn. PuzzleForm dedicates those originals to the public domain under CC0 1.0. Each card links to the licence and previews the same local mesh used by the editor. Their public puzzle previews are rendered from the editor's real build and assembly checks; a closed mesh on its own is not a guarantee that every possible printer or setting will succeed.
Do I need an account to try the editor?
You need one to export. Importing a model, slicing it, patterning it and building the puzzle all work without spending anything. Export credits are purchased separately or included in a paid plan.
What happens to my projects if I cancel?
Your saved projects and your account data are covered by the privacy notice, including how long they are kept and how to have them deleted. Anything you have already exported is a file on your own disk and is unaffected.
Privacy
What stays on your device, and what the server ever sees.
Your model file is read from your disk by the page, and every step of the cutting is computed in the tab. The file itself is uploaded only if you grant the separate quality-investigation permission in your account settings, which is off until you switch it on.
The finished puzzle is another matter, and it is worth stating plainly: the piece geometry is saved privately to your account when a build finishes, so your slice history can show it and hand it back later, and it is sent again when you export, so the archive can be built on the server and the credit taken. The export is packaged in memory; what is kept of it is a fingerprint, which is what lets you download the same export twice without paying twice.
None of that is published, shared with anyone or used for anything beyond your own account. The privacy notice lists it item by item, with retention periods.
Analytics and anything else that touches visitor data is consent-gated and described in the privacy notice. Nothing is loaded before you have made that choice.
Where can I read the full detail?
The privacy notice lists every category of data, why it is held, how long for, and who processes it. It is linked in the footer of every page.
When something goes wrong
The failures that actually happen, and what each one means.
The build ran out of time.
The grid was too fine for this machine. Reduce the rows, the columns or the layer count (the candidate cell count in step 3 is the number to watch) and build again. Nothing is lost; your settings are still there.
The build says it could not find a printable arrangement.
Some piece could not satisfy the rules at these settings. Raising the tab size is usually the fastest fix. Rolling the seed is the second. A slightly coarser grid is the third, and the most reliable.
The layer preview stayed empty.
Step 2 keeps the whole model intact and draws only the layer guides. The quick layer preview appears in Step 3; it is separate from the real build. Press Preflight & build puzzle to calculate the finished pieces even if the quick preview did not load.
The export button is locked.
A hand edit left a rule broken in a way that would not print. The reason is named beside the lock; undo the edit or fix the named piece and it unlocks.
The editor will not open on my phone or tablet.
It is a desktop tool. The geometry work needs a real processor and the viewport needs a real pointer. The rest of the site works fine on a small screen.
The model imported at the wrong size.
One unit in the file is read as one millimetre. A model authored in metres arrives a thousand times too small and one authored in centimetres ten times too large. Use the target size control in step 1 rather than rescaling the file.
Still stuck?
Use the feedback button in the corner of any page. It reaches the operator directly, and a message about a build that failed is far more useful with the settings you used.